HOW TO FIT METAL BI-FOLD DRIVEWAY GATES:
INSTALL A BI-FOLD DRIVEWAY GATE
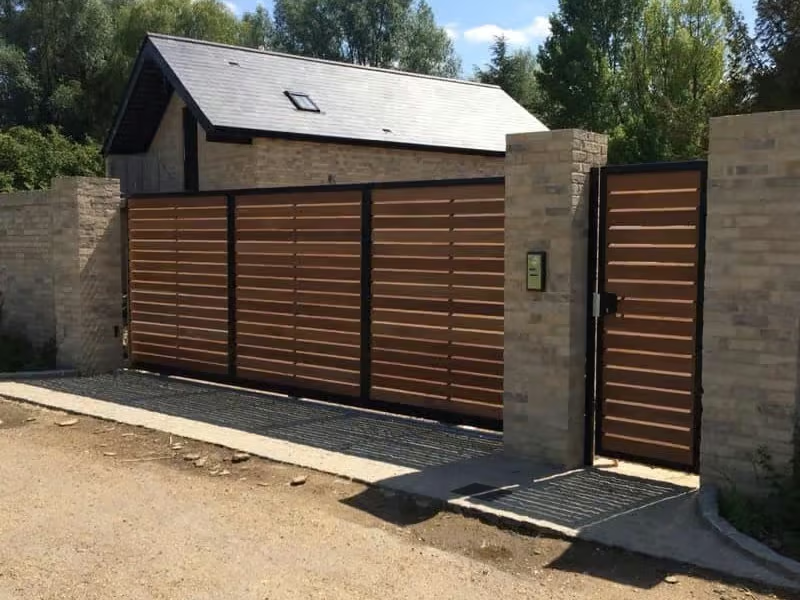
Bi-fold driveway gates add security and style to the front of your home. They help prevent unannounced visitors from entering your property easily. When coupled with a fence, you can create a protected space for your children and pets that extends beyond the limitations of your back yard.
This guide is for manual set-up only. All drop bolts and opening systems have been pre-attached to the gate. This set-up is for centre opening. For 3/1 or 4/1 opening systems, simple repeat “Connect Second Gate Leaf” section to the gate.
This set-up is for gates opening inwards towards your property.
For safety reasons, always use a professional installer for electric gates. Call us on 0800 6124 965 to discuss.
Tools:
- Pencil
- Tape measure
- Shovel
- Straight edge
- Spirit level or plumb line
- Electric drill with 16mm drill bit
- Spanner or wrench set
INSTALLING GATE POSTS
If replacing the current posts or pillars for your gate, we recommend purchasing our metal posts. These posts will come with the lugs pre welded and are long enough to be dug into the ground.
If your drive is on a slope, start with the post that is on the highest ground level.
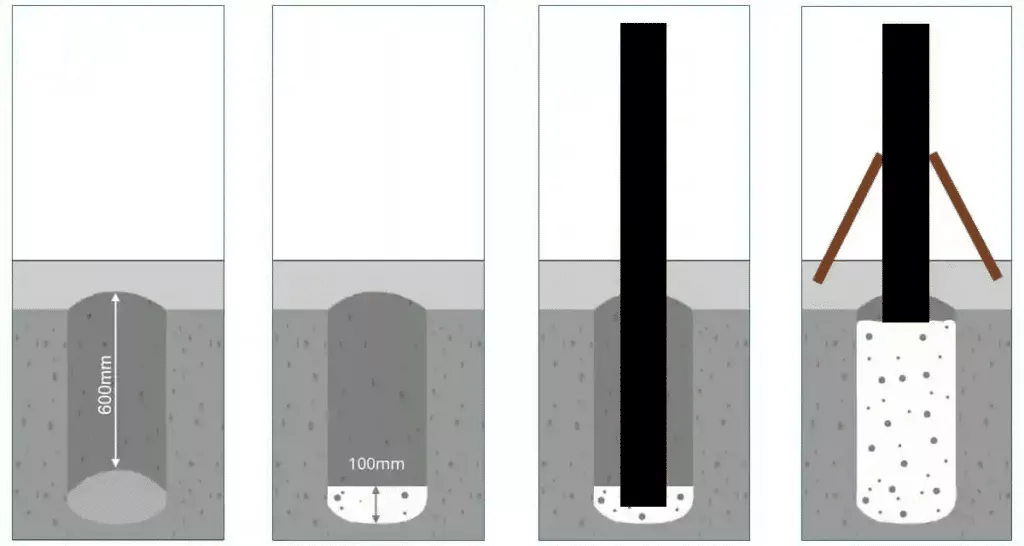
1) Dig a hole approx 600mm deep leaving a minimum of 100mm around the sides of the post edges.
2) Fill the bottom of the hole with approx 100mm concrete (this allows the post to sit on firm ground and helps protect the post from moisture damage.
3) With one person holding the post level always checking both sides frequently, whilst the second person fills the hole with concrete. If using “postcrete” please remember this will set within 10 minutes.
4) Once the hole is filled strap the post both ways to keep it still whilst the concrete sets.
Next, make a staff (basically a piece of wood, or two bits joined together) that is the width of the gates plus the hinge tolerances. This will make fitting the second post a lot easier to ensure the correct width is always achieved.
Dig the second hole. The finished height of the second post once in the ground needs to be level from the top of post 1. Use the staff to make sure the post if fitted at the correct width from the first post. Check the distance with the staff at the top,middle and bottom of the post. Start filling carefully with concrete always checking the distance and your levels. Allow the concrete to set properly before fitting any gates.
IMPORTANT:
Remember gate lugs on post to be positioned dependant on gate set-up. Most will be at the back of the post (facing towards the property).
Always fit the first post where the ground is at its highest
Level across to make sure the top of the posts are level
Ensure the posts are plumb (if one post is out of plumb make sure the second post is going the same way ie the spirit level bubble being slightly on the left on post 1 needs to be in the same position for post 2 otherwise the gates may not close with the fronts of the gates being flush)
FIT ADJUSTABLE HINGE BOLTS TO GATE LEAF
Connect both top and bottom to the gate that will attach to the post.

LOWER GATE ON POST
Two people required. Carefully lower the gate on to the lugs attached to the post.

If your drive is on a slope, start with the post that is on the highest ground level.
1) Dig a hole approx 600mm deep leaving a minimum of 100mm around the sides of the post edges.
2) Fill the bottom of the hole with approx 100mm concrete (this allows the post to sit on firm ground and helps protect the post from moisture damage.
3) With one person holding the post level always checking both sides frequently, whilst the second person fills the hole with concrete. If using “postcrete” please remember this will set within 10 minutes.
4) Once the hole is filled strap the post both ways to keep it still whilst the concrete sets.
Next, make a staff (basically a piece of wood, or two bits joined together) that is the width of the gates plus the hinge tolerances. This will make fitting the second post a lot easier to ensure the correct width is always achieved.
Dig the second hole. The finished height of the second post once in the ground needs to be level from the top of post 1. Use the staff to make sure the post if fitted at the correct width from the first post. Check the distance with the staff at the top,middle and bottom of the post. Start filling carefully with concrete always checking the distance and your levels. Allow the concrete to set properly before fitting any gates.
IMPORTANT:
Remember gate lugs on post to be positioned dependant on gate set-up. Most will be at the back of the post (facing towards the property).
Always fit the first post where the ground is at its highest
Level across to make sure the top of the posts are level
Ensure the posts are plumb (if one post is out of plumb make sure the second post is going the same way ie the spirit level bubble being slightly on the left on post 1 needs to be in the same position for post 2 otherwise the gates may not close with the fronts of the gates being flush)
CONNECT SECOND GATE LEAF
Two people required. Move around to the front of the gate. Take the second gate and line up the hinges. Secure in place using the bolts and nuts provided.

REPEAT STEPS FOR 2+2 OR 3+1 GATE SET-UP
Repeat previous steps to fit opposite side. Use the adjustable hinge bolts (that connect to posts) to ensure plumb.
DROP BOLTS
Now the gate is sitting plumb, mark the area where the drop bolts will hit the surface when the gate is closed. Drill holes using a 16mm drill bit (not supplied as can differ depending on ground type).
Repeat procedure with the gate open.

If your drive is on a slope, start with the post that is on the highest ground level.
1) Dig a hole approx 600mm deep leaving a minimum of 100mm around the sides of the post edges.
2) Fill the bottom of the hole with approx 100mm concrete (this allows the post to sit on firm ground and helps protect the post from moisture damage.
3) With one person holding the post level always checking both sides frequently, whilst the second person fills the hole with concrete. If using “postcrete” please remember this will set within 10 minutes.
4) Once the hole is filled strap the post both ways to keep it still whilst the concrete sets.
Next, make a staff (basically a piece of wood, or two bits joined together) that is the width of the gates plus the hinge tolerances. This will make fitting the second post a lot easier to ensure the correct width is always achieved.
Dig the second hole. The finished height of the second post once in the ground needs to be level from the top of post 1. Use the staff to make sure the post if fitted at the correct width from the first post. Check the distance with the staff at the top,middle and bottom of the post. Start filling carefully with concrete always checking the distance and your levels. Allow the concrete to set properly before fitting any gates.
IMPORTANT:
Remember gate lugs on post to be positioned dependant on gate set-up. Most will be at the back of the post (facing towards the property).
Always fit the first post where the ground is at its highest
Level across to make sure the top of the posts are level
Ensure the posts are plumb (if one post is out of plumb make sure the second post is going the same way ie the spirit level bubble being slightly on the left on post 1 needs to be in the same position for post 2 otherwise the gates may not close with the fronts of the gates being flush)